Tropical houseplants can bring a lush, vibrant feel to almost any room, but keeping them healthy indoors sometimes requires more than regular watering and good sunlight. Many popular tropical plants naturally grow in warm, humid environments, where moisture is present not only in the soil but also in the surrounding air. When indoor air becomes too dry, especially in air-conditioned or heated rooms, some tropical houseplants may begin showing brown leaf edges, curling leaves, crispy new growth, or slower development.
Fortunately, increasing humidity for tropical houseplants does not have to be complicated. There are several practical ways to create a more comfortable environment, from grouping plants together to using a humidifier or making small changes to where plants are positioned.
The key is understanding how humidity affects plants and choosing a method that fits your home, your plants, and your daily routine.
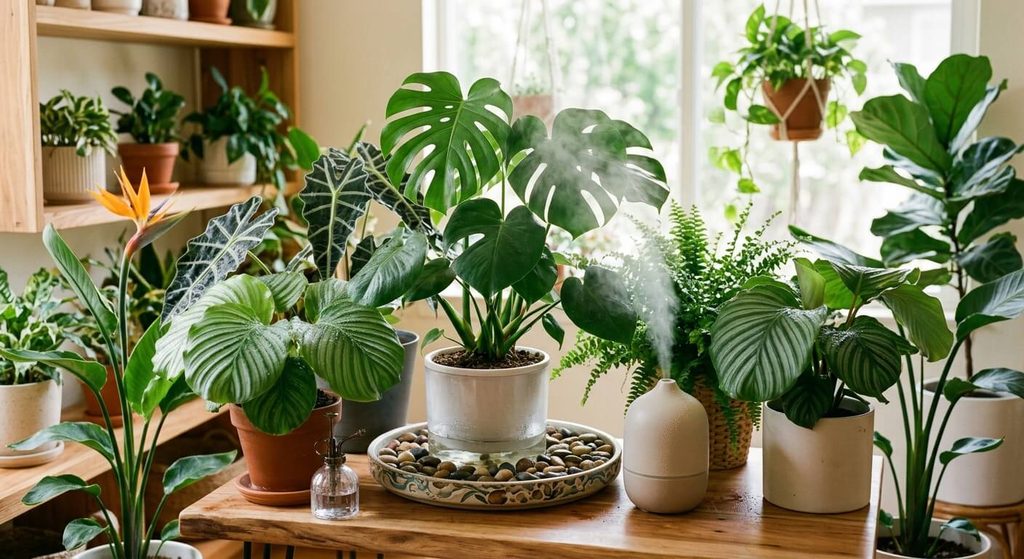
Why Humidity Matters for Tropical Houseplants
Humidity refers to the amount of water vapor present in the air. Tropical plants are adapted to environments where humidity can remain relatively high, particularly in rainforests and other moist habitats.
Plants lose water through tiny openings in their leaves called stomata. This natural process, known as transpiration, helps regulate the plant and move water and nutrients through its tissues. When the surrounding air is very dry, water can leave the leaves more quickly.
A plant growing in consistently dry indoor air may struggle to maintain the moisture balance it is accustomed to.
This does not mean every tropical houseplant requires extremely high humidity. Different species have different tolerances. A tough houseplant may adapt to average indoor conditions, while a humidity-loving plant such as a calathea, anthurium, fern, or some tropical foliage varieties may respond more noticeably to dry air.
What Humidity Level Do Tropical Houseplants Need?
There is no single humidity percentage that is perfect for every tropical houseplant.
Many tropical plants can adapt to ordinary household humidity, but humidity-loving species generally appreciate conditions that are more humid than a very dry indoor environment. Instead of trying to create a rainforest inside your home, aim for a stable environment appropriate for the particular plant.
A digital hygrometer can make this much easier. Rather than guessing whether a room feels dry, you can measure the relative humidity directly.
If your plant repeatedly develops crispy leaf edges despite proper watering, appropriate lighting, and healthy roots, checking the humidity around it can help identify whether dry air may be contributing to the problem.
1. Use a Humidifier
For consistently dry indoor environments, a humidifier is one of the most effective ways to increase humidity.
A humidifier adds water vapor to the surrounding air, allowing you to raise humidity throughout a room rather than only around one plant.
This can be particularly useful if you have a large collection of tropical houseplants.
Choose the Right Size
The humidifier should be appropriate for the size of the room. A small unit may work well beside a plant shelf, while a larger room may require a model designed for greater coverage.
It is also useful to choose a humidifier that is easy to clean and refill. A device that is inconvenient to maintain is less likely to be used consistently.
Avoid Placing It Directly Against the Plant
You do not need to point the mist directly at the leaves.
The goal is to raise the humidity of the surrounding air, not to keep the foliage constantly wet. Excess moisture sitting on leaves can contribute to fungal and bacterial problems, particularly when air circulation is poor.
Position the humidifier so moisture can disperse throughout the space.
Keep the Humidifier Clean
Regular cleaning is important. Standing water and dirty humidifiers can become sources of microorganisms and mineral buildup.
Follow the manufacturer’s cleaning instructions and change the water as recommended.
2. Group Tropical Plants Together
One of the simplest ways to increase humidity around houseplants is to place several plants together.
Plants naturally release moisture through transpiration. When multiple plants are grouped in the same area, the air immediately around them can become somewhat more humid than the surrounding room.
This creates a small, localized microclimate.
You do not need a huge collection of plants to try this technique. Even several plants arranged together on a shelf, plant stand, or table can create a more sheltered environment.
However, avoid packing plants so tightly that air cannot move between them. Good airflow is still important for reducing the risk of fungal problems and pests.
3. Place Plants on a Humidity Tray
A humidity tray is another traditional method for increasing humidity around individual plants.
To make one, place a shallow tray beneath or near the plant and add pebbles or gravel. Add water to the tray, keeping the water level below the top of the stones.
The plant pot should sit on the pebbles rather than directly in standing water.
As water evaporates, it can increase moisture in the immediate area around the plant.
Does a Humidity Tray Really Work?
A humidity tray can provide some localized humidity, but its effect is usually limited. It is unlikely to dramatically increase the humidity of an entire room.
Think of it as a small environmental adjustment rather than a replacement for a humidifier.
It can be particularly useful when you want to make a modest change without adding another electrical device.
4. Move Plants Away From Dry Air Sources
Sometimes the easiest humidity improvement is simply changing where the plant lives.
Air conditioners, heaters, fans, and strong drafts can create drier conditions around foliage. A plant sitting directly beside an air-conditioning vent may experience a noticeably different environment from a plant several feet away.
Look around your room and identify areas where air is constantly moving.
Avoid placing humidity-sensitive plants directly in front of:
- Air-conditioning vents
- Heating vents
- Strong fans
- Frequently opened exterior doors
- Drafty windows
This does not mean tropical plants should be kept in completely stagnant air. Gentle air movement is beneficial. The problem is prolonged exposure to strong, drying airflow.
5. Keep Plants in Naturally Humid Rooms
Some rooms naturally have more moisture in the air than others.
Bathrooms can sometimes provide a good environment for tropical houseplants, particularly when they receive sufficient natural or supplemental light.
A bright bathroom with regular shower use may provide naturally higher humidity than a dry bedroom or office.
Kitchens can also have higher humidity at certain times of the day, although temperature fluctuations, cooking heat, and limited light can make them less suitable for some plants.
When choosing a location, consider the entire environment rather than humidity alone.
A humid but dark room may be worse for a tropical plant than a moderately humid room with excellent indirect light.
6. Use a Glass Cabinet or Enclosed Plant Display
An enclosed cabinet can create a naturally humid microenvironment.
Because moisture released by the plants remains within the enclosure longer, humidity can rise considerably compared with an open shelf.
This approach can be especially useful for smaller tropical plants that require consistently humid conditions.
However, an enclosed environment needs careful management.
Too much moisture combined with stagnant air can encourage mold, fungal growth, and plant disease. Provide appropriate ventilation and monitor the conditions inside the cabinet.
A hygrometer is particularly useful for enclosed displays because humidity can change quickly.
7. Consider a Terrarium for Suitable Plants
Some tropical plants perform well in terrarium environments because the enclosed space retains moisture.
Terrariums can be especially suitable for smaller species that naturally prefer warm, humid conditions.
However, not every tropical houseplant belongs in a terrarium.
Large plants need more space, and some species require stronger airflow than a closed container can provide. Before placing a plant inside a terrarium, research its mature size, lighting requirements, watering needs, and tolerance for enclosed conditions.
8. Mist Carefully Rather Than Relying on Misting
Misting is one of the most commonly suggested ways to increase humidity for houseplants.
Although misting temporarily puts water droplets into the air and onto leaves, the effect on overall room humidity is usually short-lived. Once the water evaporates, the humidity returns toward its previous level.
That makes frequent misting a less reliable strategy than using a humidifier or creating a suitable microclimate.
Misting can also leave leaves wet for extended periods when airflow is poor.
For plants with delicate foliage, repeated wetting may create conditions that encourage leaf problems.
If you enjoy misting your plants, treat it as an occasional part of plant care rather than your primary humidity-control method.
9. Improve Air Circulation
Increasing humidity does not mean eliminating airflow.
In fact, good air circulation becomes increasingly important as humidity rises.
Warm, stagnant, humid air can create favorable conditions for fungal and bacterial problems. Plants also benefit from gentle air movement because it helps moisture evaporate from leaf surfaces.
A small fan can provide gentle circulation, but avoid blasting plants with strong airflow.
The goal is movement, not a constant stream of air directly across the leaves.
10. Check Humidity With a Hygrometer
A hygrometer is a simple device that measures relative humidity.
For plant owners, it can be much more useful than judging humidity by how the room feels.
Place the hygrometer near your plants, but avoid positioning it directly beside a humidifier outlet. You want to know the general conditions surrounding the plants rather than the concentrated moisture immediately coming from the machine.
If you have plants in several rooms, consider monitoring each area separately. One room may be significantly drier than another.
This can help explain why the same species performs well in one location but struggles in another.
11. Pay Attention to the Leaves
Your plants can provide useful clues about their environment.
Dry air may contribute to symptoms such as:
- Brown or crispy leaf edges
- Brown leaf tips
- Curling leaves
- Dry new growth
- Leaves that appear unusually limp
- Slower growth
However, these symptoms are not exclusive to low humidity.
Overwatering, underwatering, excessive fertilizer, root problems, pests, poor lighting, temperature stress, and natural leaf aging can all cause similar symptoms.
Before assuming humidity is the problem, consider the plant’s overall care routine.
12. Don’t Confuse Low Humidity With Underwatering
This is a common mistake among new houseplant owners.
A plant with brown leaf tips may appear to need more water, leading the owner to water more frequently. But if the soil remains wet for long periods, increasing watering can damage the roots instead of solving the original problem.
Humidity and soil moisture are two different aspects of plant care.
A plant can experience dry air while its potting mix is still adequately moist.
Always check the soil and the plant’s watering requirements before adding more water.
13. Use the Right Potting Mix
Humidity management works best when it is combined with healthy root conditions.
Tropical plants generally need a potting mix that retains enough moisture for their needs while still allowing excess water to drain away.
A compact, waterlogged growing medium can reduce oxygen around the roots and contribute to root problems.
The exact mix depends on the plant. Some tropical foliage plants prefer a chunky, airy mixture, while others have different requirements.
Good drainage is important regardless of whether the surrounding air is humid.
14. Keep Plants Away From Extreme Temperature Changes
Humidity and temperature work together.
A tropical plant may struggle when exposed to sudden temperature changes, cold drafts, or extreme heat.
For many tropical houseplants, a stable indoor environment is preferable to constantly moving the plant between dramatically different conditions.
Avoid placing sensitive plants directly beside cold windows during chilly weather or directly above heating equipment.
A comfortable room for you is often a reasonable starting point, but always check the specific requirements of the plant species.
15. Give Humidity-Loving Plants Their Own Space
If you have several different types of houseplants, they do not all need the same humidity level.
Instead of trying to make the entire home highly humid, consider creating a dedicated area for plants that need more moisture in the air.
For example, you could group humidity-loving tropical plants on one shelf and keep plants that tolerate drier conditions elsewhere.
This makes environmental control easier and prevents you from unnecessarily increasing humidity throughout your entire home.
Common Mistakes When Increasing Humidity
Increasing humidity sounds straightforward, but several mistakes can create new problems.
Making the Room Too Humid
More humidity is not automatically better.
Extremely humid conditions combined with poor ventilation can encourage mold, fungal problems, and other issues.
The goal is an appropriate, stable environment rather than maximum humidity.
Keeping Leaves Constantly Wet
Tropical plants enjoy humid air, but that does not mean their leaves should remain wet all day.
Wet foliage combined with poor air movement can create problems.
Ignoring Ventilation
A sealed room with high humidity and little airflow can become uncomfortable for both plants and people.
Use gentle air circulation when needed.
Overwatering
Increasing humidity does not mean watering more frequently.
Always distinguish between moisture in the air and moisture in the soil.
Moving Plants Too Frequently
Plants need time to adjust to their environment.
Instead of constantly moving a struggling plant from one location to another, make one change at a time and observe how the plant responds.
Which Tropical Houseplants Benefit From Higher Humidity?
Many tropical houseplants can appreciate increased humidity, but some are particularly associated with humid growing conditions.
Examples include:
- Calatheas
- Marantas
- Ferns
- Anthuriums
- Alocasias
- Certain orchids
- Some tropical palms
- Many aroids
Individual plants can still vary considerably. A particular species may tolerate ordinary household conditions better than another plant from the same general group.
Research the specific plant rather than relying solely on its classification as a “tropical” houseplant.
How to Create a Simple Humidity Station
You do not need an elaborate indoor greenhouse to create a better environment for tropical plants.
A simple setup could include:
- A group of tropical plants placed together.
- A digital hygrometer for monitoring humidity.
- A humidifier positioned nearby but not blowing directly onto the plants.
- A small fan providing gentle air circulation.
- Plants positioned away from air-conditioning vents and strong drafts.
- Pots with proper drainage and an appropriate growing medium.
This setup gives you several ways to manage the environment without depending on a single technique.
How Long Does It Take to See Results?
The amount of time required depends on the plant and the underlying problem.
If dry air is contributing to crispy new growth, improving the environment may help prevent additional damage as new leaves develop. Existing brown areas, however, generally will not turn green again.
This is important when evaluating whether your humidity adjustments are working.
Instead of expecting damaged leaves to recover, watch for healthier new growth, improved leaf texture, and fewer signs of stress.
Plant care is often about observing what happens over several weeks rather than judging the results after one day.
A Practical Humidity Routine for Tropical Houseplants
A simple routine can make humidity management much easier.
Every Few Days
Check the plants for signs of dry or damaged foliage. Look at the soil as well, since watering should be based on the plant’s requirements rather than humidity alone.
Weekly
Check your hygrometer and inspect the area around your plants.
Make sure the humidifier is clean, the plants have adequate airflow, and no leaves are pressed against one another for extended periods.
Monthly
Evaluate whether your current setup is actually helping.
If certain plants continue developing dry leaf edges, reconsider their lighting, watering, root health, temperature, and humidity rather than automatically increasing moisture.
The Best Way to Increase Humidity for Tropical Houseplants
There is no single humidity trick that works for every home or every plant.
For most indoor gardeners, the most practical approach is a combination of methods. A humidifier can provide consistent moisture to the air, grouping plants can create a small microclimate, and moving plants away from drying drafts can prevent unnecessary moisture loss.
Humidity trays and occasional misting may have limited benefits, while enclosed cabinets and terrariums can provide much stronger humidity for plants that are suited to those environments.
Most importantly, remember that humidity is only one part of successful tropical plant care. Proper lighting, watering, drainage, nutrition, temperature, and airflow all work together.
When those factors are balanced, tropical houseplants have a much better opportunity to produce healthy leaves and steady new growth. Rather than trying to recreate a rainforest indoors, focus on creating a stable environment that matches the needs of the plants you actually grow.
The written content on this page was generated by ChatGPT.
